
Like five years ago, the music instrument company Critter & Guitari came out with a video synthesizer, ETC. The concept was straightforward, an audio input is translated into video output a user can adjust with knobs and wooden buttons to make patterns on the screen dance to the audio. I went back and forth on whether to get it until they sold out and I didn't have an option. I told myself if they came out with an updated version I'd get it, and lo and behold the crazy bastards did it and renamed it Eyesy. So, I bought it.
The coolest thing (and the reason why I wanted to get the ETC/Eyesy so bad) is that it's programmable hardware. It uses Python, and more specifically the Python module Pygames, to render visuals. They give you a Wifi USB adapter to access an IDE to edit programs, or what they refer to as "Modes," and upload your own.
That's what this article is about: How to code custom Modes for the Eyesy.
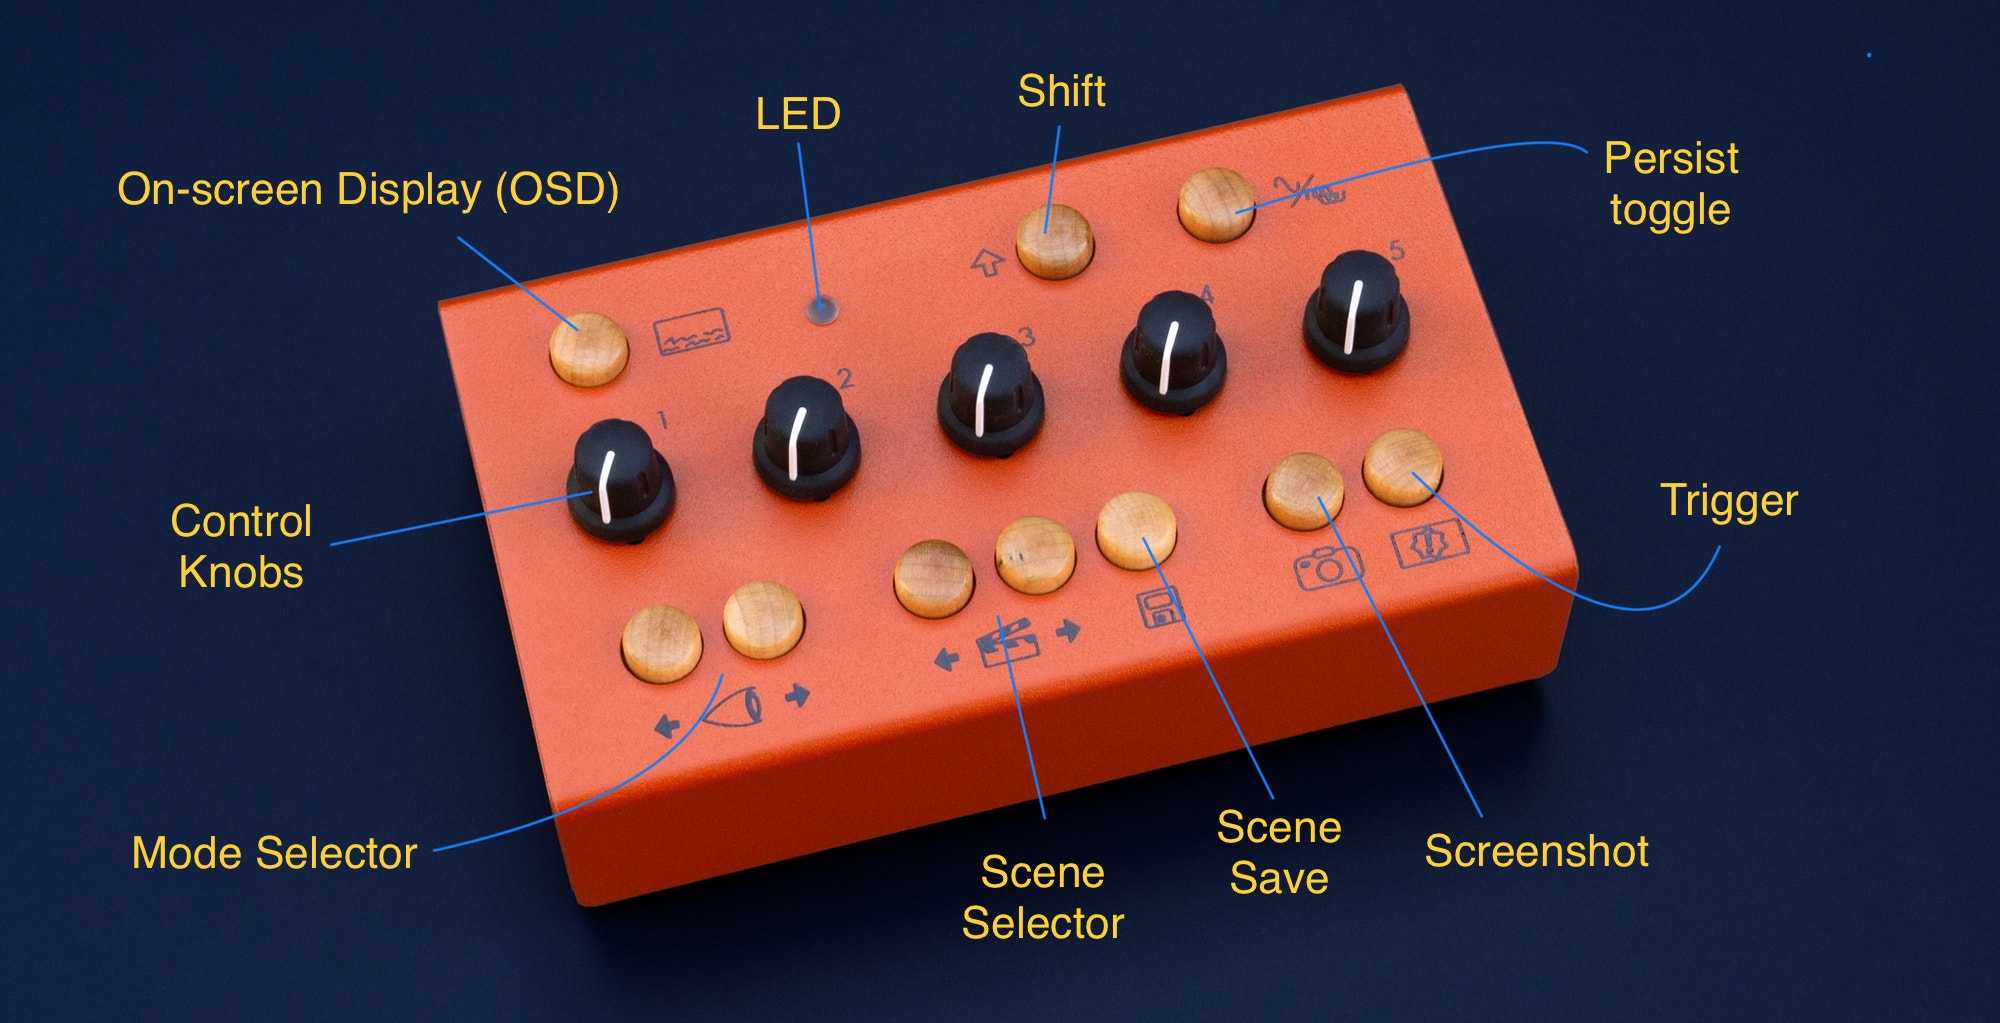
This is what it looks like and does:
-
On-screen display button shows system information.
-
Status LED indicates current state or action.
-
The knobs adjust on screen aspects like color or shape.
-
Shift is used with knobs to adjust additional system information.
-
Persist toggle, when on, will persistantly show each frame layered on top of one another, and when switched off it will only show the current frame.
-
Mode selectors change video between all stored modes in order.
-
Scene selectlors change between saved Mode states recorded with the Save Scene button.
-
The Screenshot button takes a picture of the current screen and saves it on the Eyesy
-
The Trigger button causes a trigger event that would normally be activated by sound input passing a threshold
Background:
Let's just get through the code environment and setup real quick.
The Eyesy runs on Python. So far, it seems both versions 2.X & 3.X are supported, but you can't install additional modules outside of Pygame or standard Python modules.
Recommended project structure is well defined. Each Mode/program run in a unique folder. Put Images and Fonts in appropriate folders for import, and the program is saved under a main.py file. The .pyc file extension encountered inside the IDE is automatically created by Eyesy for future use to reduce bootup and run times.
S - Beat Bat
├── Fonts
│   └── Square Chunks.ttf
├── Images
│   └── billy-bat.png
├── main.py
├── main.pyc
Programs that start with an S are scope mode, meaning it constantly reads the input. Programs that start with a T are trigger mode, meaning it changes the visual once a certain audio level threshold is hit or "triggered". This doesn't do anything to the program, this is just a good naming convention to easily understand the intended program visual.
I'm not 100% clear on backend logic. There's an API exposed to map hardware pieces to your program, but exact "let me go into this library and see the function breakdown" ain't happening. These are the main things I can infer through trial and documentation:
-
All "Modes," or programs, run simultaneously for easy, real-time switching. Writing Modes means writing them lean and only running what you need.
-
Every Mode follows a similar design structure. There's a setup function for initial loads and then a draw function that contains main program logic.
-
Images and Text Fonts are great ways to customize the look of your Modes
-
Math is cool
- Use math. It makes designs fun, and adds dynamism to the whole thing. Math can be used to alter shapes, color gradients, and audio waveforms. You don't need an advanced math skills either. There's already plenty of math graph displays online you can look up; at the end of the day, it's mainly basic algebra operations to manipulate screen coordinates and wave inputs.
Eye My Code:
The example code today is: 97.1 : Beat Bat.
This is what it'll look like:
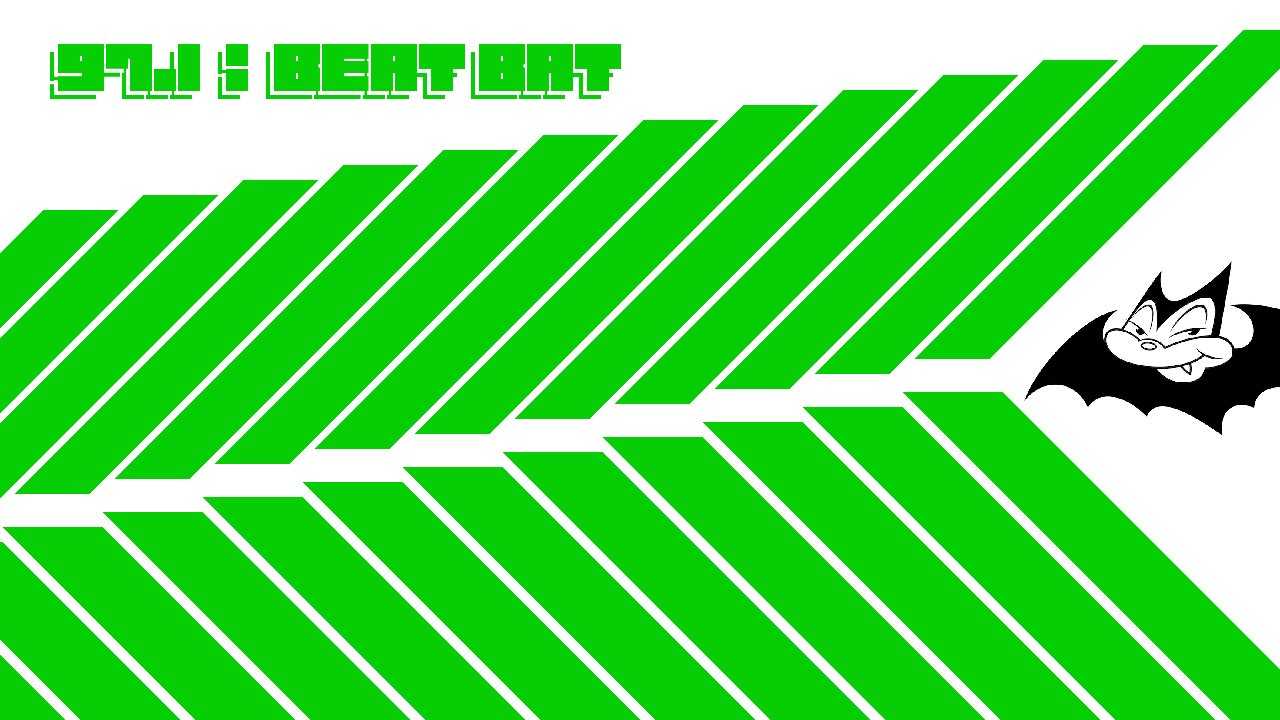
This example will draw a pattern, use image, use text/font, and assign hardware controls to manipulate on screen display.
The recommended basic mode/program structure is:
import pygame

def setup():
    pass

def draw(screen, etc):
    pass
Setup functions do exactly that. They run once on initialization and set up images, fonts, resolutions, etc. as global variables for use in the main display function: draw().
Don't skip setup functions. They make code more readable and ensure certain operations run once to be more efficient, which is important because every Mode runs at once. If you write a really slow Mode or add a bunch of junk code, the overall performance will slow down and affect other Mode displays.
Our main function, draw(), won't return anything. We pass the values screen (the display screen the Eyesy outputs to and Pygame draws on) and etc (the name of the Eyesy predecessor and API name to access internal functions/hardware).
The setup function for 97.1 : Beat Bat will identify the screen resolution we're outputting, set image/font file locations, and declare relevant global variables our draw function can access.
def setup(screen, etc):
    global xr, yr, img, font, font_size
    xr = etc.xres
    yr = etc.yres
    print(xr, yr)

    filepath = etc.mode_root + '/Images/billy-bat.png'
    img = pygame.image.load(filepath)
    font_size = 50
    font = pygame.font.Font(etc.mode_root + '/Fonts/Square Chunks.ttf', font_size)
    pass
We're using one image and one font style for this example, but more could be added.
Etc.mode_root will grab the file path to the file the current mode is stored in. Any file underneath will need to be appended. If you have several files, the built-in module glob can help grab all files and organize them as a readable array for import.
Now, walk ten paces and... draw()
def draw(screen, etc):
    pygame.time.Clock().tick(30)

    bg_color = etc.color_picker_bg(etc.knob5)
    color = etc.color_picker(etc.knob4)
    text_color = (color[0],int(127 + 127 * math.sin(25 * .0001 + time.time())),color[2])

    text = font.render('97.1  :  Beat Bat', True, color)
    text2 = font.render('97.1  :  Beat Bat', True, bg_color)
    offset = (1 + font_size//15)
    screen.blit(text, (50, 50))
    screen.blit(text2, (50 + offset, 50 - offset))
    screen.blit(text, (50 + offset * 2, 50 - offset * 2))

    point = int(etc.knob3 * 100)
    audio_flux = abs(int(etc.audio_in[0] / 100))
    audio_flux2 = abs(int(etc.audio_in[0] / 100))

    for i in range(0, 13):
        poly_points1 = []
        poly_points2 = []

        for pp in range(0, 5):
            poly_points1.append(
                ((xr - point * pp) + audio_flux - (i * 100) , (yr - point * pp) + (i * 15) + audio_flux2 )
                )
            poly_points2.append(
                ((xr - point * pp) + audio_flux - (i * 100) , (30 + point * pp) + (i * 15) + audio_flux2 )
                )

        pygame.draw.polygon(screen, color, poly_points1, 100 )
        pygame.draw.polygon(screen, color, poly_points2, 75 )

    if etc.knob1 != 0.0:
        image_size_x=int(img.get_width() * etc.knob1)
        image_size_y=int(img.get_height() * etc.knob1)
        image_res = (int(image_size_x + (audio_flux*.5)), int(image_size_y + (audio_flux2*.5)))
        image = pygame.transform.scale(img, image_res)
        image = pygame.transform.rotate(image, etc.knob2 * 100)
        screen.blit(image, (xr * .8 ,yr/2.75))
Let's break it down.
The Pygame Clock.time sets the frame rate. This can be adjusted to reduce the frame update speed of the video. I've found the higher frame rate can be hard on the eyes with how fast it changes, and having the ability to adjust the frame rate helps reduce strain. This can also help performance if a lot of Modes are running.
Background color and drawing colors are controlled with Knobs 4 & 5. The Eyesy API color picker will return an RGB value. This color can be assigned to different drawings on the screen to allow real-time color adjustment.
- The text_color variable is an optional color variable I made. It is also an RGB value, but incorporates a Sine wave to generate a color gradient as frames change. Pygame doesn't have a color gradient method, so we need to adjust RGB values using a Trig function or create custom functionality. Google and Stack Overflow have plenty of examples of how to add that functionality. This workaround adjusts the color in a range without direct knob interaction. The knob can still adjust the color range of the gradient though.
The 97.1 : Beat Bat text is the first rendered:
text = font.render('97.1  :  Beat Bat', True, color)
text2 = font.render('97.1  :  Beat Bat', True, bg_color)
offset = (1 + font_size//15)
screen.blit(text, (50, 50))
screen.blit(text2, (50 + offset, 50 - offset))
screen.blit(text, (50 + offset * 2, 50 - offset * 2))
Using the font loaded in setup, variations of the text will render to include shadow around the text. Shadowing will give more depth to the text and make it stand out against the background.
The Pygame Blit() command updates the screen to draw the text (or any other drawing you want). The offset sets the text shadows for depth.
- As an aside, there is a command called
Blits()that's a batch operation of individual blit. An array can be passed without writing each blit as a line; however, when I tried to run it on the Eyesyscreenvariable, the console saidBlits()was an unsupported operation. Either the Pygame module is out of date or the function can only be run if a separate screen object is initialized, but I didn't dive much deeper there.
Moving along, the main point of the Eyesy is for drawings to dance to audio input. The way we accomplish this is to draw images on frames and use Eyesy storeed audio input values to adjust image coordinate points between frames; essentially, we create a bouncing effect by adjusting image position relative to the audio input signal strength.
point = int(etc.knob3 * 100)
audio_flux = abs(int(etc.audio_in[0] / 100))
audio_flux2 = abs(int(etc.audio_in[0] / 100))
Etc.audio_in[i] is the value of the previous 100 audio inputs stored on a scale of -32,768 to a maximum of +32,767. We'll draw our shapes and then establish our bat image who will "dance" to this input.
To the polygons or those wide columns:
for i in range(0, 13):
    poly_points1 = []
    poly_points2 = []

    for pp in range(0, 5):
        poly_points1.append(
            ((xr - point * pp) + audio_flux - (i * 100) , (yr - point * pp) + (i * 15) + audio_flux2 )
            )
        poly_points2.append(
            ((xr - point * pp) + audio_flux - (i * 100) , (30 + point * pp) + (i * 15) + audio_flux2 )
            )

    pygame.draw.polygon(screen, color, poly_points1, 100 )
    pygame.draw.polygon(screen, color, poly_points2, 75 )
I'm running a for loop to generate pixel positions on each column. The range in the first for loop sets how many columns I want. The second range decides the n number of coordinates I want the polygons to have. The more coordinates can increase the change size and make the animation smoother. The audio flux value will offset the coordinate points I'm calculating to create the dance effect. Those coordinates go in the draw method for Pygame and length can be controlled with knob3.
Finally the Billy Bat picture:
if etc.knob1 != 0.0:
    image_size_x=int(img.get_width() * etc.knob1)
    image_size_y=int(img.get_height() * etc.knob1)
    image_res = (int(image_size_x + (audio_flux*.5)), int(image_size_y + (audio_flux2*.5)))
    image = pygame.transform.scale(img, image_res)
    image = pygame.transform.rotate(image, etc.knob2 * 100)
    screen.blit(image, (xr * .8 ,yr/2.75))
The picture coordinates start in the top left corner. I have an alpha image background to make it transparent and let background colors/images through. Knob1 controls the size of the image, and Knob2 controls the rotation.The transform method on the image will scale and rotate the image accordingly before we Blit it to the appropriate section of the screen.
The conditional to check on Knob1 is set because a memory error appeared if I tried to set Knob1 to (0,0). This resulted in the image and Pygame crashing because the scale command couldn't handle a (0,0) input. This conditional hides the image if Knob1 is at 0.0 and doesn't have it blit onto the screen. So, no more crashing.
Together, the whole thing will bounce the polygons and Billy Bat image to the audio input, and I can use a Sine wave in the text_color variable to have the text (or any other part) variate the color as audio plays.
97.1 : Beat Bat is now your home for the battiest music.
Here's a video to see how it all comes together:
Concluding Thoughts:
The Eyesy design is simple, robust, and fun. The design principles are straightforward and simple, but the plugin and design possibilities are endless. It's a neat instrument that makes live shows more interesting, creates interesting visuals DJing in the house, and is an entertaining coding project.
There are a few minor updates I think would push the Eyesy even further:
-
Let me use
Blits()on the main screen to display image collections. Not a deal breaker, but cleans up code from having to write multiple Blit lines. -
The IDE in the web adaptor is very manual. Everything has to be selected and there's no way to mass edit quickly. It's not an immediate issue, but if you did absolutely load this thing up, it could become a little irksome to manage.
-
Audio will not play through the video output. You'll need to split the signal either using audio MIDI setup or have a split cable to the Eyesy and another sound output. It would be nice to have sound output through the HDMI so no additional cables are required.
Finally, Critter & Guitari are trying to create a community with this product. They have the pre-programmed Modes on GitHub, and there's a plugin store where people share their creations openly. If you code, or just want a store to use other people's ideas, consider checking it out and contributing. Any efforts to build that community should be taken if you get the Eyesy, even if it's to share a bare, simple design.
This thing is cool as hell. I've really enjoyed getting to mess around with it and I've already got a lot of other ideas I want to test out. The out of the box functionality is good for a lot of people, but the expansive ability of the Eyesy sets it apart. The limits of the Eyesy are the limits of your imagination. Get wild with it and design whatever your third eye sees.